There’s no shortage of tutorials on how to use X11’s remote display facilities. On modern, properly configured systems, all you need to do is to use the -X or -Y option to ssh, and the magic is all taken care of by ssh and xauth. Unfortunately, sometimes servers are mis-configured and this simple solution doesn’t work.
On one server I was trying to use, sshd was compiled with a hard-coded path for xauth that was incorrect. This is easy to see when adding the “-v” switch to ssh. Look for:
debug1: Requesting X11 forwarding with authentication spoofing.
debug1: Remote: No xauth program; cannot forward with spoofing.
With no admin rights on the server, the normal work-around is to use the XAuthLocation option on the client side, either in the ~/.ssh/config file, or on the command line: ssh -o XAuthLocation=/proper/path. Some versions of sshd (including the one I was using) ignore this option.
Since I was working in a fairly secure environment, I decided to skip ssh/xauth part, and just set the DISPLAY environment variable on the server to “DISPLAY=my.client.ip:0.0”. That’s all nice and dandy, but my Ubuntu client was using Unix domain sockets instead of TCP for X11 so there was no way to connect to it remotely. First I tried modifying /etc/X11/xinit/xserverrc on the client to remove the “-nolisten tcp” option. That didn’t seem to do the trick (there was nobody listening on port 6000 after I restarted X). It turns out gdm has a different configuration file that also needs to be modified. I then changed /etc/gdm/gdm.schemas to:
     <schema>
       <key>security/DisallowTCP</key>
       <signature>b</signature>
      <default>false</default>
     </schema>
After X was restarted, I had X11 listening on port 6000. All that was left to do was to allow the server to connect (xhost +server.name.com) and everything was working like a charm.
Before you open up X11 to remote TCP connections as shown above, make sure you read up on it and understand the security implications.
See the previous post for an explanation of what we’re trying to accomplish.
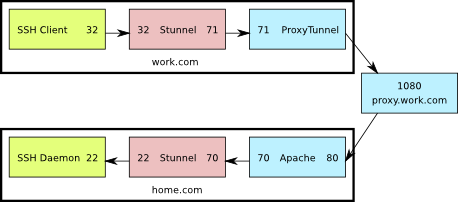
This is a diagram of what the setup looks like. The numbers shown are the TCP ports used by the various components.

SSH through Apache and Stunnel
In the Apache config file:
<VirtualHost *:80>
        ServerName home.com

        ProxyRequests on
        AllowCONNECT 70
        ProxyVia on
        <Proxy *>
                Order deny,allow
                Allow from all
        </Proxy>
</VirtualHost>
Enable the proxy connect module in Apache. On Ubuntu you just have to have the following symbolic links in
/etc/apache2/mods-enabled:
proxy.conf -> ../mods-available/proxy.conf
proxy_connect.load -> ../mods-available/proxy_connect.load
proxy_http.load -> ../mods-available/proxy_http.load
proxy.load -> ../mods-available/proxy.load
Configure Stunnel on the server the same way as for
option 1.
On the client PC, this is the proxytunnel command line you'll need to use:
C:\>proxytunnel.exe -p proxy.work.com:1080 -d home.com:70 -r home.com:80 -a 71
Configure the work.com stunnel:
sslVersion = SSLv3

; Use it for client mode
client = yes

[apache-ssh]
accept	= 32
connect	= 71
Restart apache and stunnel on the server side.
On the client side:
- Start proxytunnel using the command shown above.
- Start stunnel. If the stunnel.conf file is in the default location, no command line arguments are needed. If not, pass the config line as a command line argument to stunnel.
- Start the ssh clinet and connect to 127.0.0.1:32
Here’s what’s going on:
- The ssh client connects to port 32 on the localhost
- Stunnel is listening on port 32 on the localhost, so it receives that connection and sends it on to port 71 also on the localhost
- ProxyTunnel is listening on port 71, so it takes that connection from Stunnel and sends it to home.com:80 through proxy.work.com:8080
- The Apache server running at home.com:80 receives a CONNECT request for home.com:70, so it forwards the connection to that destination.
- Stunnel is listening on port 70 at home.com and when it receives the connection from Apache, it sends it to port 22 on home.com
- Finally, sshd is listening on home.com:22 so it receives the connection from Stunnel, allowing the user to log in
This is even less efficient than the first option, but has the advantage of not requiring another service to be exposed directly to the internet through the firewall.
See the previous post for an explanation of what we’re trying to accomplish.
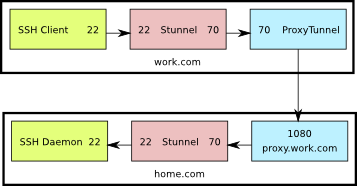
This is a diagram of what the setup looks like. The numbers shown are the TCP ports used by the various components.

SSH directly through Stunnel
Start by creating a certificate and key to be used by Stunnel (or reuse the web server certificate if you already have one).
Configure Stunnel on the server (/etc/stunnel/stunnel.conf) as follows:
cert = /etc/ssl/certs/home.com.crt
key = /etc/ssl/private/home.com.key
sslVersion = SSLv3

chroot = /var/lib/stunnel4/
setuid = stunnel4
setgid = stunnel4
; PID is created inside chroot jail
pid = /stunnel4.pid

; Service-level configuration
[stunnel-ssh]
accept  = 70
connect = 22
Also on the server, configure libwrap In
/etc/hosts.allow:
stunnel-ssh: ALL
On the client PC, this is the proxytunnel command line you'll need to use:
C:\>proxytunnel.exe -p proxy.work.com:1080 -d home.com:70 -a 70
Configure the work.com stunnel:
sslVersion = SSLv3

; Use it for client mode
client = yes

[stunnel-ssh]
accept	= 22
connect	= 70
Restart stunnel on the server side, and open up port 70 on the firewall.
On the client side:
- Start proxytunnel using the command shown above.
- Start stunnel. If the stunnel.conf file is in the default location, no command line arguments are needed. If not, pass the config line as a command line argument to stunnel.
- Start your ssh client and connect to 127.0.0.1:22
Here’s what’s going on:
- The ssh client connects to port 22 on the localhost
- Stunnel is listening on port 22 on the localhost, so it receives that connection and sends it on to port 70 also on the localhost
- ProxyTunnel is listening on port 70, so it takes that connection from Stunnel and sends it to home.com:70 through proxy.work.com:1080
- Stunnel is listening on port 70 at home.com and when it receives the connection from Apache, it sends it to port 22 on home.com
- Finally, sshd is listening on home.com:22 so it receives the connection from Stunnel, allowing the user to log in
This is by no means optimal. Packets are encrypted twice: once by ssh and once by stunnel. In the end though, if you have no other option, this should work.
Let’s say you want to ssh from your work.com PC to home.com using the proxy.work.com HTTP(S) proxy. If the work.com admins are lenient, you can use ProxyTunnel as described here and be done. If they’re more aggressive, they can block you because the protocol exchange will go something like this:
Your work.com PC says:
- CONNECT home.com:22 HTTP/1.0
- Proxy-Connection: Keep-Alive
home.com responds with:
At this point proxy.work.com is able to see that you’re trying to tunnel SSH and can block the connection.
Another option is to tunnel over HTTPS instead of HTTP. Apache however doesn’t currently (Feb. 2010) support this option. You can read more about it here and perhaps use one of the patches mentioned there to add that feature to your server.
If you don’t want to patch the web server, there’s an alternative option that involves Stunnel. That’s what this post is about.
With stunnel in place, the protocol exchange will go something like this:Watch Full Movie Online Streaming Online and Download
work.com:
- CONNECT home.com:70 HTTP/1.0
- Proxy-Connection: Keep-Alive
home.com responds with:
- HTTP/1.0 200 Connection Established
At this point stunnel takes over and hides the SSH protocol handshake letting you pass through the proxy without a hassle.
There are two ways to accomplish this. The first way requires you to open another port in your home.com firewall and allow connections to stunnel from outside. The second way uses your Apache server as a second proxy.

