On a stock Ubuntu 11.04 distribution, wpa_cli can not talk to wpa_supplicant. Regardless of the options used, wpa_cli will always report:
Could not connect to wpa_supplicant - re-trying
That’s because wpa_cli expects to talk to wpa_supplicant over a control socket, but the default wpa_supplicant command line options don’t create a control socket (only the D-Bus interface is activated).
The fix is fairly easy. Modify the following file:
/usr/share/dbus-1/system-services/fi.epitest.hostap.WPASupplicant.service
and pass the -O option to wpa_supplicant by replacing the
Exec=/sbin/wpa_supplicant -u -s
line with
Exec=/sbin/wpa_supplicant -u -s -O /var/run/wpa_supplicant
Notice, that’s a capital-o, not a zero in the command line.
Restart the supplicant with: sudo killall wpa_supplicant and run ps auxww | grep wpa_supplicant to verify that the new options are being used.
If you notice that your changes are ignored, try making the same changes to:
/usr/share/dbus-1/system-services/fi.w1.wpa_supplicant1.service
You should now be able to run wpa_cli without any command line options (or with wpa_cli -p /var/run/wpa_supplicant) and talk to wpa_supplicant.
There are a number of solutions out there that allow you to back up your Google mail, but all of them have some significant shortcomings. That’s pretty surprising given the popularity of GMail. BaGoMa aims to address all (or most) of them.
- BaGoMa is a command line application, so you can easily automate the backup. A GUI might be added in the future if there’s enough of a demand for it.
- It runs on all major operating systems: Linux, Windows, Mac OS X, basically anything that Python runs on. For Windows users the zip file even contains a stand-alone executable that has the Python interpreter and libraries built-in, so you don’t need to install anything else.
- It is open sourced, and contributions from the community are welcomed and encouraged. That also means you can read the source code yourself to make sure your password and emails remain private.
- It has no arbitrary limitations on the tag/label names you can use in Google. Some other solutions out there expect you to only use ASCII. That means non-English users are out of luck. It even auto-detects the main types of folders in use so that it can skip folders such as “Spam” and “Trash”.
- Most importantly, it is tuned to work specifically with Google mail. There are a lot of generic applications that are able to backup an IMAP account. GMail however is not a true IMAP account. For example, if you apply 5 tags/labels to an email message, it shows up in 5 different IMAP folders. From the perspective of a regular IMAP application those look like 5 distinct messages, so they get backed up 5 times. It’s not clear what would happen when you attempt to restore your mail from such a backup. Will you end up with 5 identical copies of the message, each with a single tag/label, or will you end up with a single message that has 5 tags? BaGoMa does the right thing. In this case that means the message only gets downloaded (and backed up) once, and when restored all the original tags are applied to the same message.
The use of BaGoMa is extremely simple. To back up your account all you need is:
bagoma --email=your_user_id@gmail.com
It works seamlessly with Google Apps for Business, so if you’re hosting your business email with Google you can use your business email address instead of YourUserId@gmail.com to back up your business account. Please note that if you don’t specify a backup directory, BaGoMa will use a directory that matches your email address. Email addresses are case insensitive, but on operating systems with case-sensitive file systems you need to be consistent in how you write your email address, or specify the backup directory.
To restore your email you would run:
bagoma --email=your_user_id@gmail.com --action=restore
So what are you waiting for? Give it a try and stop worrying about forgetting your password and getting locked out of your account, or losing important emails if Google ever has an E-Mail outage.
There’s no shortage of tutorials on how to use X11’s remote display facilities. On modern, properly configured systems, all you need to do is to use the -X or -Y option to ssh, and the magic is all taken care of by ssh and xauth. Unfortunately, sometimes servers are mis-configured and this simple solution doesn’t work.
On one server I was trying to use, sshd was compiled with a hard-coded path for xauth that was incorrect. This is easy to see when adding the “-v” switch to ssh. Look for:
debug1: Requesting X11 forwarding with authentication spoofing.
debug1: Remote: No xauth program; cannot forward with spoofing.
With no admin rights on the server, the normal work-around is to use the XAuthLocation option on the client side, either in the ~/.ssh/config file, or on the command line: ssh -o XAuthLocation=/proper/path. Some versions of sshd (including the one I was using) ignore this option.
Since I was working in a fairly secure environment, I decided to skip ssh/xauth part, and just set the DISPLAY environment variable on the server to “DISPLAY=my.client.ip:0.0”. That’s all nice and dandy, but my Ubuntu client was using Unix domain sockets instead of TCP for X11 so there was no way to connect to it remotely. First I tried modifying /etc/X11/xinit/xserverrc on the client to remove the “-nolisten tcp” option. That didn’t seem to do the trick (there was nobody listening on port 6000 after I restarted X). It turns out gdm has a different configuration file that also needs to be modified. I then changed /etc/gdm/gdm.schemas to:
     <schema>
       <key>security/DisallowTCP</key>
       <signature>b</signature>
      <default>false</default>
     </schema>
After X was restarted, I had X11 listening on port 6000. All that was left to do was to allow the server to connect (xhost +server.name.com) and everything was working like a charm.
Before you open up X11 to remote TCP connections as shown above, make sure you read up on it and understand the security implications.
See the previous post for an explanation of what we’re trying to accomplish.
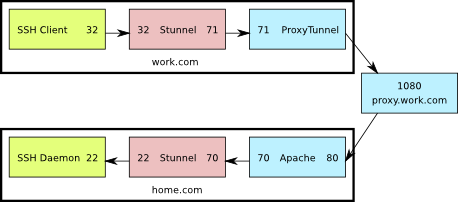
This is a diagram of what the setup looks like. The numbers shown are the TCP ports used by the various components.

SSH through Apache and Stunnel
In the Apache config file:
<VirtualHost *:80>
        ServerName home.com

        ProxyRequests on
        AllowCONNECT 70
        ProxyVia on
        <Proxy *>
                Order deny,allow
                Allow from all
        </Proxy>
</VirtualHost>
Enable the proxy connect module in Apache. On Ubuntu you just have to have the following symbolic links in
/etc/apache2/mods-enabled:
proxy.conf -> ../mods-available/proxy.conf
proxy_connect.load -> ../mods-available/proxy_connect.load
proxy_http.load -> ../mods-available/proxy_http.load
proxy.load -> ../mods-available/proxy.load
Configure Stunnel on the server the same way as for
option 1.
On the client PC, this is the proxytunnel command line you'll need to use:
C:\>proxytunnel.exe -p proxy.work.com:1080 -d home.com:70 -r home.com:80 -a 71
Configure the work.com stunnel:
sslVersion = SSLv3

; Use it for client mode
client = yes

[apache-ssh]
accept	= 32
connect	= 71
Restart apache and stunnel on the server side.
On the client side:
- Start proxytunnel using the command shown above.
- Start stunnel. If the stunnel.conf file is in the default location, no command line arguments are needed. If not, pass the config line as a command line argument to stunnel.
- Start the ssh clinet and connect to 127.0.0.1:32
Here’s what’s going on:
- The ssh client connects to port 32 on the localhost
- Stunnel is listening on port 32 on the localhost, so it receives that connection and sends it on to port 71 also on the localhost
- ProxyTunnel is listening on port 71, so it takes that connection from Stunnel and sends it to home.com:80 through proxy.work.com:8080
- The Apache server running at home.com:80 receives a CONNECT request for home.com:70, so it forwards the connection to that destination.
- Stunnel is listening on port 70 at home.com and when it receives the connection from Apache, it sends it to port 22 on home.com
- Finally, sshd is listening on home.com:22 so it receives the connection from Stunnel, allowing the user to log in
This is even less efficient than the first option, but has the advantage of not requiring another service to be exposed directly to the internet through the firewall.
See the previous post for an explanation of what we’re trying to accomplish.
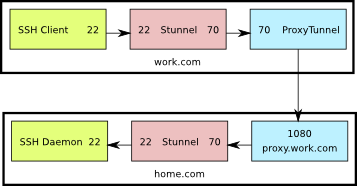
This is a diagram of what the setup looks like. The numbers shown are the TCP ports used by the various components.

SSH directly through Stunnel
Start by creating a certificate and key to be used by Stunnel (or reuse the web server certificate if you already have one).
Configure Stunnel on the server (/etc/stunnel/stunnel.conf) as follows:
cert = /etc/ssl/certs/home.com.crt
key = /etc/ssl/private/home.com.key
sslVersion = SSLv3

chroot = /var/lib/stunnel4/
setuid = stunnel4
setgid = stunnel4
; PID is created inside chroot jail
pid = /stunnel4.pid

; Service-level configuration
[stunnel-ssh]
accept  = 70
connect = 22
Also on the server, configure libwrap In
/etc/hosts.allow:
stunnel-ssh: ALL
On the client PC, this is the proxytunnel command line you'll need to use:
C:\>proxytunnel.exe -p proxy.work.com:1080 -d home.com:70 -a 70
Configure the work.com stunnel:
sslVersion = SSLv3

; Use it for client mode
client = yes

[stunnel-ssh]
accept	= 22
connect	= 70
Restart stunnel on the server side, and open up port 70 on the firewall.
On the client side:
- Start proxytunnel using the command shown above.
- Start stunnel. If the stunnel.conf file is in the default location, no command line arguments are needed. If not, pass the config line as a command line argument to stunnel.
- Start your ssh client and connect to 127.0.0.1:22
Here’s what’s going on:
- The ssh client connects to port 22 on the localhost
- Stunnel is listening on port 22 on the localhost, so it receives that connection and sends it on to port 70 also on the localhost
- ProxyTunnel is listening on port 70, so it takes that connection from Stunnel and sends it to home.com:70 through proxy.work.com:1080
- Stunnel is listening on port 70 at home.com and when it receives the connection from Apache, it sends it to port 22 on home.com
- Finally, sshd is listening on home.com:22 so it receives the connection from Stunnel, allowing the user to log in
This is by no means optimal. Packets are encrypted twice: once by ssh and once by stunnel. In the end though, if you have no other option, this should work.

