In Ubuntu 10.04 (Lucid) there’s no deb package for libjs. I needed to use version 1.8 of libjs with MediaTomb. Normally this would mean you download the source code for libjs and “./configure; make; make install” but the source code for libjs 1.8 doesn’t come with a configure script, or with an install target in the Makefile.ref file.
The SpiderMonkey Build Documentation is helpful in getting a build done, but points to some SpiderMonkey manual installation instructions that are no longer available. If you create a file called Makefile in the js/src directory with the contents shown below, you can issue the normal “make install” to install libjs. Better yet, you should install the “checkinstall” package and use:film Skiptrace streaming
checkinstall -D make install
This will create a debian package (-D) that does the same thing as “make install”.
Make sure you use a hard tab to indent the lines below “install:” target or else the Makefile won’t work. Since the build result is placed in a subdirectory named based on the system, you might have to adjust the BLD (look for the location of the libjs.so file). The PREFIX should probably be /usr when used with checkinstall, and /usr/local otherwise.
BLD := Linux_All_OPT.OBJ
#PREFIX := /usr/local
PREFIX := /usr

install:
        cp ${BLD}/libjs.so ${PREFIX}/lib
        cp ${BLD}/js ${PREFIX}/bin
        cp ${BLD}/jscpucfg ${PREFIX}/bin
        cp ${BLD}/jskwgen ${PREFIX}/bin
        mkdir -p ${PREFIX}/include/js
        cp *.h ${PREFIX}/include/js
        cp *.tbl ${PREFIX}/include/js
        cp ${BLD}/*.h ${PREFIX}/include/js
See the previous post for an explanation of what we’re trying to accomplish.
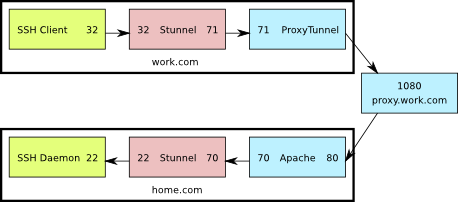
This is a diagram of what the setup looks like. The numbers shown are the TCP ports used by the various components.

SSH through Apache and Stunnel
In the Apache config file:
<VirtualHost *:80>
        ServerName home.com

        ProxyRequests on
        AllowCONNECT 70
        ProxyVia on
        <Proxy *>
                Order deny,allow
                Allow from all
        </Proxy>
</VirtualHost>
Enable the proxy connect module in Apache. On Ubuntu you just have to have the following symbolic links in
/etc/apache2/mods-enabled:
proxy.conf -> ../mods-available/proxy.conf
proxy_connect.load -> ../mods-available/proxy_connect.load
proxy_http.load -> ../mods-available/proxy_http.load
proxy.load -> ../mods-available/proxy.load
Configure Stunnel on the server the same way as for
option 1.
On the client PC, this is the proxytunnel command line you'll need to use:
C:\>proxytunnel.exe -p proxy.work.com:1080 -d home.com:70 -r home.com:80 -a 71
Configure the work.com stunnel:
sslVersion = SSLv3

; Use it for client mode
client = yes

[apache-ssh]
accept	= 32
connect	= 71
Restart apache and stunnel on the server side.
On the client side:
- Start proxytunnel using the command shown above.
- Start stunnel. If the stunnel.conf file is in the default location, no command line arguments are needed. If not, pass the config line as a command line argument to stunnel.
- Start the ssh clinet and connect to 127.0.0.1:32
Here’s what’s going on:
- The ssh client connects to port 32 on the localhost
- Stunnel is listening on port 32 on the localhost, so it receives that connection and sends it on to port 71 also on the localhost
- ProxyTunnel is listening on port 71, so it takes that connection from Stunnel and sends it to home.com:80 through proxy.work.com:8080
- The Apache server running at home.com:80 receives a CONNECT request for home.com:70, so it forwards the connection to that destination.
- Stunnel is listening on port 70 at home.com and when it receives the connection from Apache, it sends it to port 22 on home.com
- Finally, sshd is listening on home.com:22 so it receives the connection from Stunnel, allowing the user to log in
This is even less efficient than the first option, but has the advantage of not requiring another service to be exposed directly to the internet through the firewall.
See the previous post for an explanation of what we’re trying to accomplish.
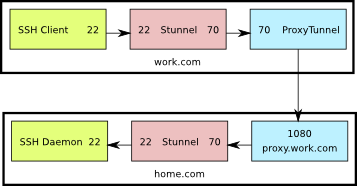
This is a diagram of what the setup looks like. The numbers shown are the TCP ports used by the various components.

SSH directly through Stunnel
Start by creating a certificate and key to be used by Stunnel (or reuse the web server certificate if you already have one).
Configure Stunnel on the server (/etc/stunnel/stunnel.conf) as follows:
cert = /etc/ssl/certs/home.com.crt
key = /etc/ssl/private/home.com.key
sslVersion = SSLv3

chroot = /var/lib/stunnel4/
setuid = stunnel4
setgid = stunnel4
; PID is created inside chroot jail
pid = /stunnel4.pid

; Service-level configuration
[stunnel-ssh]
accept  = 70
connect = 22
Also on the server, configure libwrap In
/etc/hosts.allow:
stunnel-ssh: ALL
On the client PC, this is the proxytunnel command line you'll need to use:
C:\>proxytunnel.exe -p proxy.work.com:1080 -d home.com:70 -a 70
Configure the work.com stunnel:
sslVersion = SSLv3

; Use it for client mode
client = yes

[stunnel-ssh]
accept	= 22
connect	= 70
Restart stunnel on the server side, and open up port 70 on the firewall.
On the client side:
- Start proxytunnel using the command shown above.
- Start stunnel. If the stunnel.conf file is in the default location, no command line arguments are needed. If not, pass the config line as a command line argument to stunnel.
- Start your ssh client and connect to 127.0.0.1:22
Here’s what’s going on:
- The ssh client connects to port 22 on the localhost
- Stunnel is listening on port 22 on the localhost, so it receives that connection and sends it on to port 70 also on the localhost
- ProxyTunnel is listening on port 70, so it takes that connection from Stunnel and sends it to home.com:70 through proxy.work.com:1080
- Stunnel is listening on port 70 at home.com and when it receives the connection from Apache, it sends it to port 22 on home.com
- Finally, sshd is listening on home.com:22 so it receives the connection from Stunnel, allowing the user to log in
This is by no means optimal. Packets are encrypted twice: once by ssh and once by stunnel. In the end though, if you have no other option, this should work.
Let’s say you want to ssh from your work.com PC to home.com using the proxy.work.com HTTP(S) proxy. If the work.com admins are lenient, you can use ProxyTunnel as described here and be done. If they’re more aggressive, they can block you because the protocol exchange will go something like this:
Your work.com PC says:
- CONNECT home.com:22 HTTP/1.0
- Proxy-Connection: Keep-Alive
home.com responds with:
At this point proxy.work.com is able to see that you’re trying to tunnel SSH and can block the connection.
Another option is to tunnel over HTTPS instead of HTTP. Apache however doesn’t currently (Feb. 2010) support this option. You can read more about it here and perhaps use one of the patches mentioned there to add that feature to your server.
If you don’t want to patch the web server, there’s an alternative option that involves Stunnel. That’s what this post is about.
With stunnel in place, the protocol exchange will go something like this:Watch Full Movie Online Streaming Online and Download
work.com:
- CONNECT home.com:70 HTTP/1.0
- Proxy-Connection: Keep-Alive
home.com responds with:
- HTTP/1.0 200 Connection Established
At this point stunnel takes over and hides the SSH protocol handshake letting you pass through the proxy without a hassle.
There are two ways to accomplish this. The first way requires you to open another port in your home.com firewall and allow connections to stunnel from outside. The second way uses your Apache server as a second proxy.
I tried uploading a C# file to go along with a previous post, but kept getting an “IO Error” from WordPress. That wasn’t very helpful. Fortunately when I tried doing the same thing from Linux, I got a slightly more informative message telling me that the “File type does not meet security guidelines”. If you have a different idea than the developers of what constitutes a “security threat”, you can modify the list of file types that can be uploaded to WordPress. Find the wp-includes/functions.php file in your installation directory, and add your new MIME type(s) to the default list in get_allowed_mime_types function.
BTW, this only works if you have control over your WordPress install. If you’re using a hosted solution I guess you have to put up with it.
This is the code you’ll want to modify:
/**
 * Retrieve list of allowed mime types and file extensions.
 *
 * @since 2.8.6
 *
 * @return array Array of mime types keyed by the file extension regex corresponding to those types.
 */
function get_allowed_mime_types() {
        static $mimes = false;

        if ( !$mimes ) {
                // Accepted MIME types are set here as PCRE unless provided.
                $mimes = apply_filters( 'upload_mimes', array(
                'jpg|jpeg|jpe' => 'image/jpeg',
                'gif' => 'image/gif',
                'png' => 'image/png',
                'bmp' => 'image/bmp',
                'tif|tiff' => 'image/tiff',
                'ico' => 'image/x-icon',
                'asf|asx|wax|wmv|wmx' => 'video/asf',
                'avi' => 'video/avi',
If you have a lot of file types and don’t want to bother adding them all, another option is to modify your wp-config.php file and add the following line:
define('ALLOW_UNFILTERED_UPLOADS', true);

