Archive

Archive for the ‘Uncategorized’ Category

Using Android IPC binders from native code

July 7th, 2012 9 comments

This is a follow-up (with actual code examples) to a post I wrote a while ago on how to use the Android IPC system from native C++ code. The code is hosted on GitHub at Android IPC binder demo. A number of readers have asked for sample code after reading the previous post, so hopefully this helps.

When executed without any arguments, the binary acts as a service (named “Demo”). When executed with an integer argument (ex: “binder 743”), the binary acts as a client that searches for the “Demo” service, binds to it, and exercises its API. To keep things simple, there’s virtually no error checking. Some debug messages are sent to stdout, and others to logcat.

The suggested way to run this demo to have 3 windows open and issue the following commands in them:

  1. adb logcat -v time binder_demo:* *:S
  2. adb shell binder
  3. adb shell binder 456

Now for a brief explanation of the code. The IInterface, BpInterface, and BnInterface classes are provided by the Android framework.

We start by defining an interface (think AIDL) that will be shared between the service and the client:

class IDemo : public IInterface {
    public:
        enum {
            ALERT = IBinder::FIRST_CALL_TRANSACTION,
            PUSH,
            ADD
        };
        // Sends a user-provided value to the service
        virtual void        push(int32_t data)          = 0;
        // Sends a fixed alert string to the service
        virtual void        alert()                     = 0;
        // Requests the service to perform an addition and return the result
        virtual int32_t     add(int32_t v1, int32_t v2) = 0;

        DECLARE_META_INTERFACE(Demo);
};

// This implementation macro would normally go in a cpp file
IMPLEMENT_META_INTERFACE(Demo, "Demo");

Next we define the server end, which is made up of 2 classes: BnDemo, and its derived class, Demo. BnDemo extracts the arguments from the data Parcel sent by the client, calls the appropriate virtual function (implemented in the Demo class) to do the heavy-lifting, and packs the returned values (if any) into a reply Parcel to be sent back to the client.

class BnDemo : public BnInterface<IDemo> {
    virtual status_t onTransact(uint32_t code, const Parcel& data,
                                Parcel* reply, uint32_t flags = 0);
};

status_t BnDemo::onTransact(uint32_t code, const Parcel& data,
                            Parcel* reply, uint32_t flags) {

    data.checkInterface(this);

    switch(code) {
        case ALERT: {
            alert();
            return NO_ERROR;
        } break;
        case PUSH: {
            int32_t inData = data.readInt32();
            push(inData);
            return NO_ERROR;
        } break;
        case ADD: {
            int32_t inV1 = data.readInt32();
            int32_t inV2 = data.readInt32();
            int32_t sum = add(inV1, inV2);
            reply->writeInt32(sum);
            return NO_ERROR;
        } break;
        default:
            return BBinder::onTransact(code, data, reply, flags);
    }
}

This is the Demo class, which would normally do the real work on the service side of the binder.

class Demo : public BnDemo {
    virtual void push(int32_t data) {
        // Do something with the data the client pushed
    }
    virtual void alert() {
        // Handle the alert
    }
    virtual int32_t add(int32_t v1, int32_t v2) {
        return v1 + v2;
    }
};

Now we define a service proxy, to be used on the client side. Notice again that any data the client needs to send to the service is packed in a Parcel and results (if any) are also returned in a Parcel.

class BpDemo : public BpInterface<IDemo> {
    public:
        BpDemo(const sp<IBinder>& impl) : BpInterface<IDemo>(impl) { }

        virtual void push(int32_t push_data) {
            Parcel data, reply;
            data.writeInterfaceToken(IDemo::getInterfaceDescriptor());
            data.writeInt32(push_data);
            remote()->transact(PUSH, data, &reply);
        }

        virtual void alert() {
            Parcel data, reply;
            data.writeInterfaceToken(IDemo::getInterfaceDescriptor());
            remote()->transact(ALERT, data, &reply, IBinder::FLAG_ONEWAY);
        }

        virtual int32_t add(int32_t v1, int32_t v2) {
            Parcel data, reply;
            data.writeInterfaceToken(IDemo::getInterfaceDescriptor());
            data.writeInt32(v1);
            data.writeInt32(v2);
            remote()->transact(ADD, data, &reply);

            int32_t res;
            status_t status = reply.readInt32(&res);
            return res;
        }
};

Finally, we start the service as follows:

        defaultServiceManager()->addService(String16("Demo"), new Demo());
        android::ProcessState::self()->startThreadPool();

And the client can now connect to the service and call some of the provided functions:

    sp<IServiceManager> sm = defaultServiceManager();
    sp<IBinder> binder = sm->getService(String16("Demo"));
    sp<IDemo> demo = interface_cast<IDemo>(binder);

    demo->alert();
    demo->push(65);
    int32_t sum = demo->add(453, 827);

There’s a lot more that could be said, but I’m not planning on writing the book on the subject. If you’ve made it this far, you should be able to figure out the rest. The full compilable code is at BinderDemo.
Categories: Uncategorized Tags:

Editing GEDCOM files with vim

March 5th, 2012 2 comments

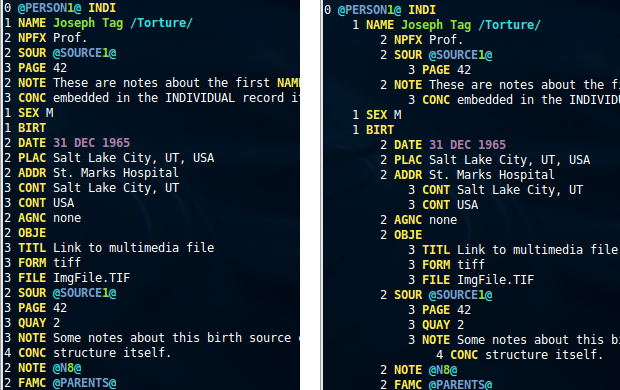
GEDCOM files sometimes have no indentation. That makes it difficult to read or edit them with a text editor. Using the following simple instructions, you can auto-indent the file so that it is more readable in the vim editor.

Compare the readability of the two formats

Save the next few lines into a file called gedcom_indent. Make the file executable and place it somewhere in your path.

#!/usr/bin/env python

from __future__ import print_function
import sys

for line in sys.stdin:
    line = line.lstrip()
    try:
        level = int(line.split(' ', 1)[0])
        print('\t' * level, end='')
    except:                                                                                                                                            
        pass
    print(line, end='', sep='')

Now add the following 2 lines to your ~/.vimrc file:

autocmd BufReadPost,FileReadPost *.ged %!gedcom_indent
autocmd FileType gedcom set foldmethod=indent nolist ts=4

This tells vim to filter any file with a “ged” extension through the small gedcom_indent filter (which will add leading tabs to the file). The second line tells it to make each TAB count for 4 spaces, and to fold based on indentation.

Categories: Uncategorized Tags: , ,

Git Quick Reference Card

September 24th, 2011 No comments

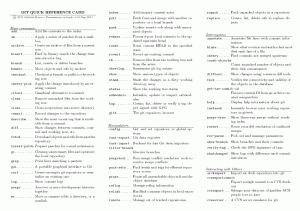
Git has a lot of commands. Well over 100 of them. Most of the times you only use a handful of them, but if you’re a power-user, every once in a while you’re looking for that elusive command that you remember reading about. This Git quick reference card sums them all up for you so you can look up the details using Git’s help system (git help <command>).

Git Quick Reference Card - Page 1

Git Quick Reference Card - Page 2

The reference card is available as a PDF so you can print it out. The PDF version is derived from the TeX file which is hosted at http://github.com/gburca/git-qrc so anyone can update it.

Categories: Uncategorized Tags:

How to make wpa_cli talk to wpa_supplicant in Ubuntu

September 15th, 2011 5 comments

On a stock Ubuntu 11.04 distribution, wpa_cli can not talk to wpa_supplicant. Regardless of the options used, wpa_cli will always report:

Could not connect to wpa_supplicant - re-trying

That’s because wpa_cli expects to talk to wpa_supplicant over a control socket, but the default wpa_supplicant command line options don’t create a control socket (only the D-Bus interface is activated).

The fix is fairly easy. Modify the following file:

/usr/share/dbus-1/system-services/fi.epitest.hostap.WPASupplicant.service

and pass the -O option to wpa_supplicant by replacing the

Exec=/sbin/wpa_supplicant -u -s

line with

Exec=/sbin/wpa_supplicant -u -s -O /var/run/wpa_supplicant

Notice, that’s a capital-o, not a zero in the command line.

Restart the supplicant with: sudo killall wpa_supplicant and run ps auxww | grep wpa_supplicant to verify that the new options are being used.

If you notice that your changes are ignored, try making the same changes to:

/usr/share/dbus-1/system-services/fi.w1.wpa_supplicant1.service

You should now be able to run wpa_cli without any command line options (or with wpa_cli -p /var/run/wpa_supplicant) and talk to wpa_supplicant.

Categories: Uncategorized Tags:

Smart backup for your GMail account

May 28th, 2011 4 comments

There are a number of solutions out there that allow you to back up your Google mail, but all of them have some significant shortcomings. That’s pretty surprising given the popularity of GMail. BaGoMa aims to address all (or most) of them.

  1. BaGoMa is a command line application, so you can easily automate the backup. A GUI might be added in the future if there’s enough of a demand for it.
  2. It runs on all major operating systems: Linux, Windows, Mac OS X, basically anything that Python runs on. For Windows users the zip file even contains a stand-alone executable that has the Python interpreter and libraries built-in, so you don’t need to install anything else.
  3. It is open sourced, and contributions from the community are welcomed and encouraged. That also means you can read the source code  yourself to make sure your password and emails remain private.
  4. It has no arbitrary limitations on the tag/label names you can use in Google. Some other solutions out there expect you to only use ASCII. That means non-English users are out of luck. It even auto-detects the main types of folders in use so that it can skip folders such as “Spam” and “Trash”.
  5. Most importantly, it is tuned to work specifically with Google mail. There are a lot of generic applications that are able to backup an IMAP account. GMail however is not a true IMAP account. For example, if you apply 5 tags/labels to an email message, it shows up in 5 different IMAP folders. From the perspective of a regular IMAP application those look like 5 distinct messages, so they get backed up 5 times. It’s not clear what would happen when you attempt to restore your mail from such a backup. Will you end up with 5 identical copies of the message, each with a single tag/label, or will you end up with a single message that has 5 tags? BaGoMa does the right thing. In this case that means the message only gets downloaded (and backed up) once, and when restored all the original tags are applied to the same message.

The use of BaGoMa is extremely simple. To back up your account all you need is:

bagoma --email=your_user_id@gmail.com

It works seamlessly with Google Apps for Business, so if you’re hosting your business email with Google you can use your business email address instead of YourUserId@gmail.com to back up your business account. Please note that if you don’t specify a backup directory, BaGoMa will use a directory that matches your email address. Email addresses are case insensitive, but on operating systems with case-sensitive file systems you need to be consistent in how you write your email address, or specify the backup directory.

To restore your email you would run:

bagoma --email=your_user_id@gmail.com --action=restore

So what are you waiting for? Give it a try and stop worrying about forgetting your password and getting locked out of your account, or losing important emails if Google ever has an E-Mail outage.

BaGoMa homepage: http://sourceforge.net/p/bagoma/

BaGoMa downloads: http://sourceforge.net/projects/bagoma/files/

BaGoMa documentation: http://bagoma.sourceforge.net/

Categories: Uncategorized Tags: , , , ,