In Ubuntu, installing clang-3.6 doesn’t provide you with clang or clang++ links to the clang-3.6 or clang++-3.6 executables, or a way of easily selecting the active clang version when you have multiple versions installed.
This command/script creates a clang group using update-alternatives so you can easily execute clang (without the version number) and switch between different clang versions.
I used to maintain my dead-tree book collection in Alexandria. When that stopped being developed I switched to Tellico. Tellico however doesn’t have a simple way of retrieving cover images, so recently I switched to using Calibre.
The following python script automates the process of converting from Tellico to Calibre so you don’t have to re-enter all the books by hand.
Install requirements (BeautifulSoup v4 is used to parse the XML):
sudo apt-get install python-bs4
Extract the Tellico data (the Tellico file (*.tc) is just a zip file with the XML data and cover images):
mkdir /tmp/tellico
cd /tmp/tellico
unzip [/path/to/tellico/file/MyBookLibrary.tc]
Now run the import/conversion script. The only argument it needs is the path to the tellico.xml file that you just unzipped:
python Tellico2Calibre.py tellico.xml
All the books are tagged with “Print”, and if they’re marked as loaned out in Tellico they also get the “Loaned” tag. The following data is imported:
- Title
- Authors
- ISBN
- Cover image
- Publisher
- Published date
- Comments
- Rating
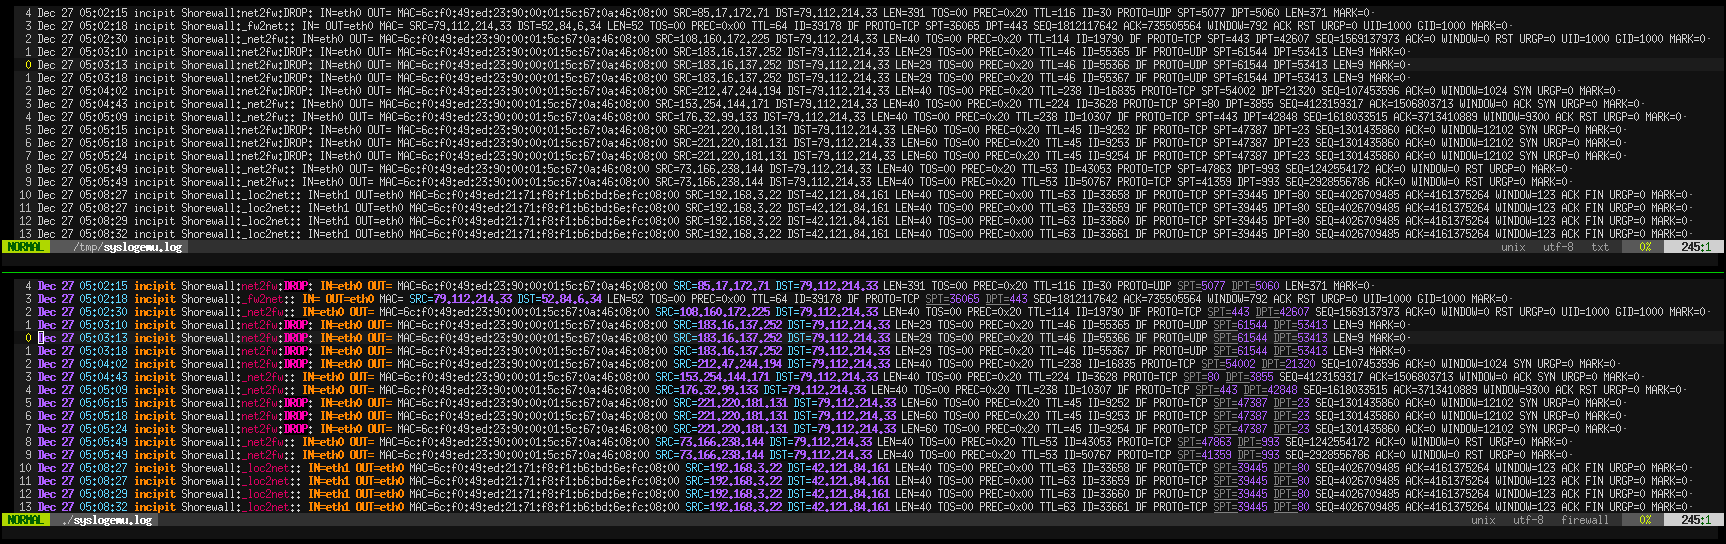
Firewall logs are verbose, and utterly boring to look at. It’s hard to pick out the important parts, like what the IP or destination port was. If you use vim/gvim to view the logs, there’s a syntax file I put together to make them more readable. Get it from https://github.com/gburca/vim-firewall
Here’s a before/after image (click for the full size):
Vim syntax highlighting for firewall logs.
It turns out that monitoring a file with vim is harder than it should be. Scripts such as Tail-Bundle and WatchForChanges rely on vim’s CursorHold events which only trigger once. Unlike tail -f, they only work if you’re active in that vim session and pressing keys to cause CursorHold to re-arm.
tail -f works well, but lacks the syntax highlighting and other features from vim.
Some other options require 2 terminals, or 2 separate scripts.
The solution below is very similar to tail -f. The primary difference is that it only monitors a single file at a time.
Get the latest version from: https://gist.github.com/4a334b61e1c34b438ccd.git
#!/bin/bash

# Usage: vim-tail.sh <filename>
#
# This script turns vim into a `tail -f` equivalent, but with syntax
# highlighting and all the other goodies.
#
# A version of vim compiled with +clientserver is required.
# On Ubuntu 14.04, vim.tiny, vim.basic and vim.nox won't work.
# vim.gtk is compiled with +clientserver, so `apt-get install vim-gtk`
#
# Author: Gabriel Burca <gburca dash github at ebixio dot com>

# Pick one of: vim|view|gvim|gview, etc...
VI=vim.gtk

# A unique name for the server, in case we monitor multiple files.
NAME="TAIL$$"

doForever() {
    # Give the vim server a chance to start
    sleep 2

    # Move to the end of the file
    $VI --servername $NAME --remote-send '<C-\><C-N>:edit!<CR>G' > /dev/null 2>&1 || exit

    while true; do
        # This blocks until the file changes, or the timeout expires
        inotifywait --quiet --quiet --timeout 10 --event modify "$1"
        # 0 = the file was modified
        # 2 = the timeout expired
        if (( $? == 0 || $? == 2 )); then
            $VI --servername $NAME --remote-send '<C-\><C-N>:edit!<CR>G' > /dev/null 2>&1 || exit
        else
            exit 1
        fi

        # It's possible for the file to be modified before we loop back to
        # `inotifywait`, but we'll pick it up on the next round.
    done
}

# Kick off the vim client script in the background
coproc doForever "$1"

# Now start the server
$VI --servername $NAME --remote-silent "$1"
# Nothing below here executes until the `tail` server exits.
Watch Full Movie Online Streaming Online and Download
These are the steps I found are required to install DigiKam v4.10 on Ubuntu. In my case I ran into problems with libavcodec (ffmpeg/libav) and issues stemming from the ffmpeg project fork. YMMV.
First install digikam:
add-apt-repository ppa:philip5/extra
apt-get update
apt-get install digikam
At this point everything should have worked nicely. Unfortunately digikam (version: 4:4.10.0-trusty~ppa3) wouldn’t start up. Running it from the command line showed that I was missing libavcodec.so.53. To confirm:
ldd /usr/bin/digikam | grep libavcodec
The normal solution to this would have been:
apt-get install libavcodec-extra-53
But life is not that simple. Ubuntu deprecated and removed libavcodec-extra-53 and claims libav-tools should be used instead. libav-tools however doesn’t include a libavcodec.so.53 file, so after a bit of hunting around, I decided to just build it from source. Here are the steps:
git clone git://source.ffmpeg.org/ffmpeg.git
cd ffmpeg
git checkout -b ver53 dd453f
./configure --prefix=/usr/local --disable-ffmpeg --disable-ffplay --disable-ffprobe --disable-ffserver --disable-avdevice --disable-swresample --disable-swscale --disable-postproc --disable-avfilter --enable-shared --disable-debug --enable-gpl --enable-x11grab
make
sudo su -
checkinstall
ldconfig
After this, digikam started up properly.
Notes:
gitk --all libavcodec/version.h shows that after the dd453f commit the libavcodec version changes to 54, so that’s why that commit was used.